BLOG
What Do You Need to Know to Start Shooting Photos or Videos?
Here are four functions of your camera that are KEY to understanding when you start shooting photos or videos.
If you understand these four functions and how to manipulate them in your camera, your photos and videos will immediately look better.
The first time picking up a professional or consumer-grade camera feels like trying to solve a complex puzzle. Between all the menus, buttons and options, the uninitiated are right to feel lost.
Here’s why you shouldn’t let that stop you:
- Modern cameras come packed full of features, most of which are there to make your life as a photographer or videographer easier. This includes focus peaking to ensure what you want to be in focus is and zebra stripes to point out overexposed sections of your shot.
- There are TONS of resources online to learn about your camera quickly to start shooting photos or videos.
- Consumer-grade cameras are becoming more affordable and powerful every year.
- While your iPhone can shoot great-looking video/photo, a professional or consumer-grade camera made in the past five years will blow it out of the water if you know what you’re doing.

The FOUR functions you need to know to start shooting photos or videos:
Shutter Speed
Shutter speed is how long your camera’s eye, or shutter, stays open to expose the camera’s digital sensor to light, thereby capturing data used to generate an image. This is usually measured on your camera by fractions of a second. For example, 1/500 of a second will allow half as much light as 1/250 of a second. An image captured at 1/500 of a second will be darker than the 1/250, but it will provide a crisper image if there is movement in the scene because your camera captures the image twice as fast.
Think practically about shutter speed when you start shooting photos or videos. Imagine you are trying to capture an image of a bird on a very bright day. To do so, you would need to set your shutter speed to be very quick as it will lessen the amount of light being let in and increase the sharpness of an object in motion, such as the bird in flight.
Aperture
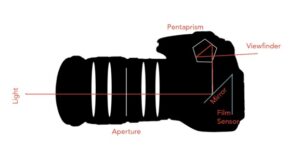
Shutter speed is not the only function you have when trying to expose your image for proper lighting. The aperture refers to the size of your lens’s opening, which controls how much light hits your camera’s digital sensor. Aperture is measured using f-stops: the ratio of the camera lens’s focal length and aperture diameter. This technical term is essential to understand as your aperture affects two aspects of your image, brightness and depth of field.
A lower f-stop, such as an f/1.4, means a larger aperture letting in more light. However, this larger aperture leads to a shallower depth of field, meaning less of your image will be in focus. A higher f-stop, such as an f/8, will increase your depth-of-field, meaning more things will be in focus but will decrease the amount of light hitting your sensor, leading to a darker image.
ISO
This is the sensitivity of your camera’s sensor to light. When increasing ISO, or as we call it, ‘fake light,’ your camera will boost the brightness of the image, but at a certain point, the boost in brightness will lead to a grainy image with less detail. It is best practice to keep your ISO as low as possible while capturing a bright enough image.
White Balance
White balance refers to how your camera registers incoming light, giving the image a color temperature. This is measured in Kelvin (K), with each light source (such as the sun or an incandescent light bulb) registering their corresponding temperatures.
Light at noon, is around 5500 K, while dark orange candlelight is warmer, about 2000 K. You don’t want your white balance set to incandescent when you are shooting in daylight and vice versa.
When you start shooting photos or videos, ensure your camera is balanced correctly before shooting. A great way to do this is by pointing your frame at a white sheet of paper and calibrating your camera, so the paper is white in the frame.
Start Shooting Photos or Videos with Frozen Fire
Understanding these camera functions is essential to start shooting photos or videos. Not a photographer? No problem! Reach out to Frozen Fire for your photography and videography needs. Call us at: (214) 745-3456 or visit our website to join our newsletter list!
- corporate
- testimonials
- graphics
- medical
- how-to
- corporate -> 369562564
- graphics -> 327990229
- graphics -> 369394547
- howto -> 173821027
- medical -> 119281873
- testimonials -> 99368318
- testimonials -> 368924518
- corporate -> 334901132
- medical -> 200402374
- graphics -> 211543413
- graphics -> 97151495
- medical -> 187895506
- corporate -> 231781692
- graphics -> 340949694
- corporate -> 165159794
- testimonials -> 352335083
- howto -> 151937791
- corporate -> 245777109
- corporate -> 251348757
- testimonials -> 313894185
- howto -> 136022642
- corporate -> 282731340
- howto -> 340471664
- graphics -> 127517060
- howto -> 104456877
- corporate -> 277341399
- medical -> 245777279
- testimonials -> 262555694
- medical -> 225340721
- corporate -> 129692526
- medical -> 298419967
- corporate -> 315482207
- medical -> 227466634
- corporate -> 326842959
- howto -> 135998435
- corporate -> 264624664
- corporate -> 198094944
- testimonials -> 153537648
- howto -> 173819644
- graphics -> 247513797
- corporate -> 339429751
TELL US ABOUT YOUR PROJECT
Want to know more about video pricing. Check out our article here.